
Costume Change
- Oct 5, 2016
- 2 min read

You've finished an amazing Thanksgiving dinner, now what to do with your pumpkin centerpieces? Here are a few options.
This first one is pretty simply. White spray paint completely covering the entire pumpkin wait a few hours, make sure the paint has dried and now spell a spooky word across the front of the pumpkins with a contrasting colour. (each pumpkin has 1 letter written on it, so make sure you have enough pumpkins to spell your word...I wasn't sure if I needed to explain that, better safe then sorry!)
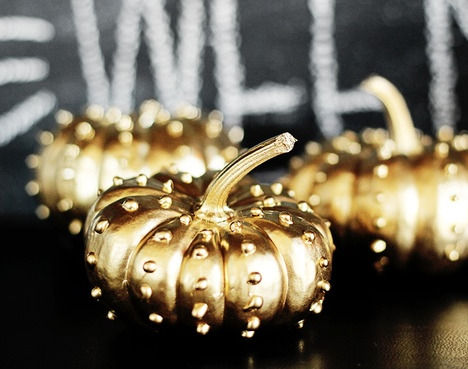
Next option is the STUDDED pumpkin...my favourite! There are two different ways to achieve these looks. Bottom left- use a glue gun and dot down the sides of the pumpkins. Once its dried, grab and shake your gold metallic spray can like crazy (if you don't the consistency is blotchy and it won't have a consistent shine) now spray the pumpkin all over and allow it to dry. Arrange them on your dining room table, they will 'pop' more with a black table cloth or runner, add some candles- voila! Bottom right- this will take a bit more time then the gold pumpkins, decide if you are painting each pumpkin the same or if you split the colours etc. If you split the colours, paint your one half the lighter colour then let it dry, don't worry about the lines being perfect. Once it dries tape it off just under the paint line so when you apply the darker colour the lines are crisp. (best tape is (yellow) Frog tape). If your wanting to achieve the more bolder black and gold studded pumpkin, tape the stem at the top, paint the entire pumpkin black (let it dry) and apply the gold studs with a glue gun. The studs can be purchased from any craft store in your area. These two pumpkin designs are a little more elegant then the typical carved pumpkin and they will last a bit longer. Goodluck!


The third design is a lot of fun with kids- hahah I'm totally joking, no it wouldn't be, not with my kids anyway. This project is pretty easy, it just takes some extra time for the design at the end. Start with painting your pumpkin all one colour, don't worry about taping off the stem because you'll paint it with the 'puffy' paint at the end. Once your pumpkin is completely dry you can choose a 'puffy' paint colour and start your design, whether it's a tree with bats flying around or spider web. It's completely up to you. The 'puffy' paint can be purchased at Walmart in the crafts department. To be safe let the paint dry for 12 hours. The more the merrier, you can never have enough pumpkins!

My last suggestion and probably the best- do this once the rug-rats go to bed, they will most definitely want to "help".
Happy Halloween!!!
Check out Friday's post------->> a DIY project from start to finish!
lush-fab-glam.com // momstastic.com // lifestyled.com // minimalisti.com
Comments